Friday 10 April 2020

Slugs


I made a beer trap to reduce slugs in my garden, and, because it only used things I was going to throw out anyway, it was completely free. Free is my favourite kind of gardening, and reducing plastics being sent to recycling and landfill sites is always a good thing.

I noticed yesterday that something had been eating my pea plants as soon as they sprouted,  and my first suspicion is usually always slugs.* However, we are on semi-lockdown so I can't really run out and buy copper tape or fancy traps right now. Also, I spent all my money on a fancy pants raised bed, and a couple of obelisk thingies that were on sale, for my squashes to climb up,** so I needed a cheap solution to my slug issue.

The peas I've been overwintering since October are staring to flower. They're lovely,  but I don't want them to be the only peas I get this year.

* this may be misplaced suspicion,  because it has been very dry lately and slugs usually like moist weather, but doing beer traps is quicker than sitting up all night with a torch, staking out my peas to see what's nibbling. If the traps keep coming up empty,  I'll have a rethink.

**for some reason the clothes airer I used to support my butternut squash plants last year developed a...fanbase? You lot are odd.  But yes, Clarence the clothes horse will be back this year too, to support the pumpkins. Again, I do love to reuse stuff I'd normally have thrown out.

You will need:


  • 2 small tubs of similar sizes, with one being small enough to fit fairly snugly inside the other.
Small margarine tubs are ideal, but you can also use food packaging, the bottoms of plastic milk bottles, yogurt pots, pretty much anything. 


  • A can or bottle of beer or cider.
The cheapest of the cheap stuff will do nicely. In usual circumstances I'd tell you to go smile sweetly at the local pub landlord and ask if you can have the dregs from the drip trays - they'll usually  be glad to give them to you for nothing. At the moment though, with pubs being closed, that isn't really an option. So get some manky own brand or have a rummage in the back of the cupboard. I found a bottle in the back of the fridge from last Christmas and that'll do fine. Slugs can't read expiry dates.

  • Something flat to cover it with  to keep other critters out. 
Random scrap of wood, half a brick, old saucer,  old plastic lid, anything will do. Don't use the lid of your tub though - it needs to be smaller than your tub so there's access for the slugs. 

  • Something to dig a small hole with - a trowel is perfect. 

That's it!

Putting your beer trap together


Take the slightly smaller of your two tubs, and pierce some holes in it. You don't need loads, just enough so that when you lift it out of the other tub the beer will run out into the tub below, leaving the slugs in the tub with holes in. This will make it a lot less unpleasant to empty, and will mean you're using less beer to top it up. 

I skipped this step by using a plastic strawberry punnet as my inner tub,  which helpfully came with holes already in it, and fits nicely in my margarine tub. 

Next dig a hole large enough for your biggest tub to sit in, with its edge level with the ground.
I found it easier to dig a hole slightly bigger than I needed, sit the tub inside and then backfill around it like I was planting a new plant.

Once your bigger tub is in the ground, put your holey tub inside it. Then fill the tubs with beer.

It doesn't matter if the whole tub isn't full - using a whole bottle only half filled my trap, but the slugs will still be able to smell it.

To keep other animals and bugs out, reduce evaporation so you aren't constantly refilling it, and make it even more attractive to the slugs you're trying to trap, you want to cover most of the trap with something. I used a piece of very thin ply that I had in the shed, but you can use anything you've got lying around.

I put a stone on top to stop my cover being blown away.

In a couple of days I'll take up the cover, lift out the inner tub  (slowly so as not to spill all the beer!), and empty out any dead slugs before replacing the the inner tub and topping it up with beer if it needs it.

What do you do to keep your veggies safe from slugs? Tell me in the comments or come for a chat on twitter with the hashtag #VsBoringGardenTweets.

Happy growing!

Saturday 4 April 2020

Free Compost Update


If you were following along with me last year, you may be wondering how I got on with my homemade compost that I made for my upcycled bed bed. To recap, I was really pleased with how the raised bed turned out, but worried about how we would afford to fill it with compost. It's a huge bed. In the end I decided to try and make compost myself, in the bed - a cross between trenching, composting and making a lasagne bed.  You can read all about how I did it in the link above.

I went out today to assess the state of the home made compost, and I wasn't expecting greatness, for several reasons.
1. I had pretty much neglected the entire thing since before Christmas.  Hadn't dug it, hadn't turned it, hadn't really added anything to it. What can I say, I'm lazy.
2. I hadn't covered it over with any black plastic like I advised you to, because I didn't have any. It's not essential but it does speed the composting process up.
And
3. We hadn't had any very harsh weather this year. Hard frosts and snow areports both good for the land, they break down organic matter and clods of earth quickly. A mild winter here was great for my half hardy perennials,  but not fantastic for the soil.

Once again my garden gave me a pleasant surprise. The soil looked messy at first but once I gave it all a good turning over it wasn't too bad at all.

As you can see some of the larger dead plants have yet to break down very well (I probably should've chopped them up smaller), and there is some persistent grass and a creeping cleaver or two in there, but overall the soil quality seemed quite good. 

The level is a little lower than I'd have liked though, and I probably could've made it higher if I had continued to add layers of organic matter and newspaper through January and early February instead of just neglecting it. But again, lazy. So I decided to top it up today so the soil could warm up before my seedlings go in in a few weeks.

I put another layer of  newspaper down on top of my new soil. It won't do much in terms of suppressing weeds (although it may help, who knows?) but it will break down and release more carbon into the soil.

I watered it over with rainwater, because as I said in my original post about this bed, you want the soil to be a living organism and nothing can live without water, but also to stop it blowing away long enough for me to add a very fine layer of shop bought compost as a top dressing.
And then gave the whole thing another good water. 

I'm pleased with how it turned out. As the bits that haven't yet broken down rot down over the season, they'll release more nutrients into the soil to feed my plants. I plan on having some squashes, amongst other things, in that bed and they're heavy feeders too, so they'll like that, and I'll save money on expensive shop bought fertilisers.

I'm hoping to get that bed fully planted up over the next few weeks, with my squashes, some edible flowers, and maybe some beans and carrots. 

I've just been gifted two wooden obelisks for the veg garden too, and I have to decide where they're going to go, and whether I'm going to grow beans or squashes up them. I wasn't planning anything quite as fancy as that, so it's thrown me into a bit of a tizzy! 

Happy growing!

Thursday 2 April 2020

Planting Potatoes


I am finally well enough to garden again, after 3 long weeks of being housebound and worrying I'd miss the entire spring, so today was an absolutely exhausting catch up day in the garden, which mostly focused on planting the potatoes.

As I said in my most recent post, the potatoes have been chitting (growing "eyes") on our windowsill for a week or two now.  I know some people start them off in the dark, perhaps planting potatoes that have sprouted in the cupboard, but I find the long, pale shoots that come off those potatoes to be weak and snap off easily. We start ours on the windowsill and the shoots grown green and strong, and not as long as shoots that have been searching for light.

We tried growing potatoes in bags last year,  but I honestly forgot all about them come harvest time because they were tucked away under the fuscia. I also had a lot more seed potatoes this year, and not very many suitable bags or containers, so I decided to grow them in the ground this year instead. It is more labour intensive and takes up more space but I'm hoping that will mean much higher yields.

First step was to dig a trench. This took us a couple of days (because we had all been poorly and didn't want to overdo things), and looked suspiciously like we were digging a grave.

We stripped the turf and laid it upside down next to the bed. It'll rot down over the season and turn into lovely rich loam,  which the worms will love. Then we dug using a fork to loosen the soil and a shovel to hoof the newly loosened soil into a pile next to the trench. I won't lie - it was hard work. Probably really good for your abs, but we spread it over a few days so we would be able to walk when we were done.

Once we had the trench a good spade and a half to two spade depths deep, I chucked some cut grass in the bottom of it. Potatoes are greedy, they like plenty of nutrients, and as that breaks down it will feed the plants from the bottom up. Because potatoes are so greedy, I also added as much of my home made banana peel fertiliser as I had in the house, as a slower release fertiliser.
After my grass and banana peel mix was added, I put a small amount of shop bought compost down. Really didn't use very much - the bag you can see in the first picture is a 20L bag.  I used all of it for the potatoes, using around a quarter of it (so approx 5L) for this stage. 
Then I laid my seed potatoes, with the little eyes pointing upwards, on top of the compost. Some people cut their seed potatoes in half and leave them to heal for a couple of days before planting, especially if they are large and have plenty of shoots /eyes growing. I didn't do that, because I had plenty of seed potatoes for my space (in fact, I've probably planted them a bit too close together).

Once I had all my seed potatoes in the trench, I covered them over with a handful of compost each, then covered the whole bed with just a little bit of the soil I had dug up to make the trench, and kept in a heap next to it.

As you can see in the above picture, the trench is far from full; there's only just enough topsoil there to cover the seed potatoes up. 

As the potato plants grow and their green leaves start to pop up, they will need to be "earthed up" -ie covered in soil - a few times to encourage them to make tubers. So at this point I took what was left of my small bag of compost - about half of it - and mixed it with the heap of topsoil I have next to the potato trench. 

As the potato plants grow, I'll keep scooping the topsoil/compost mix over them until I can't pile it any higher. Then it'll just be a case of allowing them to do their thing until harvest time. We'll see how it goes.

I got loads more done in the garden today, including making a sort of fence to keep the dog out of my veggies (he never digs where I want him to), planting lots of beneficial and edible flowers, and tending my upcycled bookcase and bed to bed beds, but I'm too tired from doing all of that today to write a post on them right now, so I'll come back and link to them in the next few days.

If you have any top tips for planting potatoes, let me know about them in the comments section. Happy growing!


Thursday 26 March 2020

Spring Forward


It's that time of year again, the garden is waking up and starting to stretch, so it's time to blow the dust and cobwebs off this blog and let you know what I've been up to.

It's a strange start to the season, in part because here in the south east of the UK we didn't get much of a winter, but mostly because Coronavirus has been keeping us at home. No pottering round the garden centre to steal ideas and rescue neglected discounted plants, no foraging for wild garlic in the woods, no bargain hunting round garage sales and free ads. Luckily what I do have is some seeds, some outdoor space, and some bored children. We can create a lot out of that.

I always planned to kick things up a notch this year, in terms of how much I was growing, but the fresh food shortages in the shops have given me added motivation, so I'm probably going to plant much more than I'll be able to keep up with. I wouldn't recommend that if it's your first year - plant a couple of bits that you enjoy eating and can give lots of time to. You'll likely have a better crop because of it. I'm ignoring my own advice because it's my second year, I already had a little bit of veg growing experience before I started last year, and I'm envisioning a long season ahead with nothing much else to do.

On the windowsill:


I don't actually have a huge amount of suitable windowsill space in my house but I'm making do with what I have to start seeds off. I used some small pots to start off some courgette, butternut squash, and pumpkin seeds, as well as some tomato seeds. The squash family are a joy to start from seed and a great project to do with toddlers and young children because the seeds are big and chunky, they germinate quite quickly, and once they start off they grow so fast you can almost see it happening. Great for people who need a bit of instant gratification.

Beginning to germinate (about 3 days after sowing)

The next morning (4 days after sowing)

The day after that (5 days after sowing)

They'll probably get overcrowded quite quickly, and I'll need to move them. I sowed 2 seeds per pot expecting a poor germination rate because it was cheap seed (from Wilko) but they all seem like very happy seedlings.

As well as my squash plants, I've also sown some tomatoes, which are starting to sprout:

As you can see the seedlings (and their seeds) are a lot smaller and more delicate than the squashes, so it might be difficult for little fingers to plant individual seeds.  Don't worry if you end up with loads in the pot like this, we can just pick out the smaller, less healthy looking seedlings and grow on the ones you want.

The other thing on my windowsill right now is cut and come again lettuce. I had run out of pots but I had a rubbish old loaf tin that I never used (because it doesn't let the bread cook evenly) and I figured it'd do. I like reusing and hate sending stuff to landfill. 

I put a few stones in the bottom of it for drainage but you probably don't even need to do that because lettuce is a shallow rooted plant and the tin is deep, so the roots are unlikely to ever be waterlogged.
I will try and remember to turn this every day so it doesn't go leggy from the lack of light, and in a week so so I will sow some more seed on the bare patches of soil in the pot so I get a longer harvest season. This is a fab little crop to grow because , as a cut and come again variety, it will benefit from a good trim every now and then, and will regrow when it's cut, giving us several little harvests. Much better than having a row of iceberg lettuces all ready for harvest at once and being sick of the sight of lettuce halfway through day 2 after harvest.

In the garden:


We have been busy in the garden too. The grass has had its first cut of the year, and I've been trying to stop the dog scratching one particular area of the garden (while also making our pollinator friends happy) by planting some perrennial flowers - primroses and daffodils mostly. 

We picked them up on special offer at the garden centre a week or two before everything shut down, because yellow is my daughter's favourite colour and she wanted something to brighten the garden and her spirits. Then my youngest son brought home some daffodils from school for Mother's Day, so I added them in too. In between I have scattered some seeds I saved from last year's marigolds. They were F1 hybrids, which don't always produce good seed, and I'm not sure if I harvested them at the right time, so we will see if they come up or not, but if they do it should make a great area for our bees and butterflies.

And hopefully, because they're supposed to be perennials, most of these flowers will come back year after year.

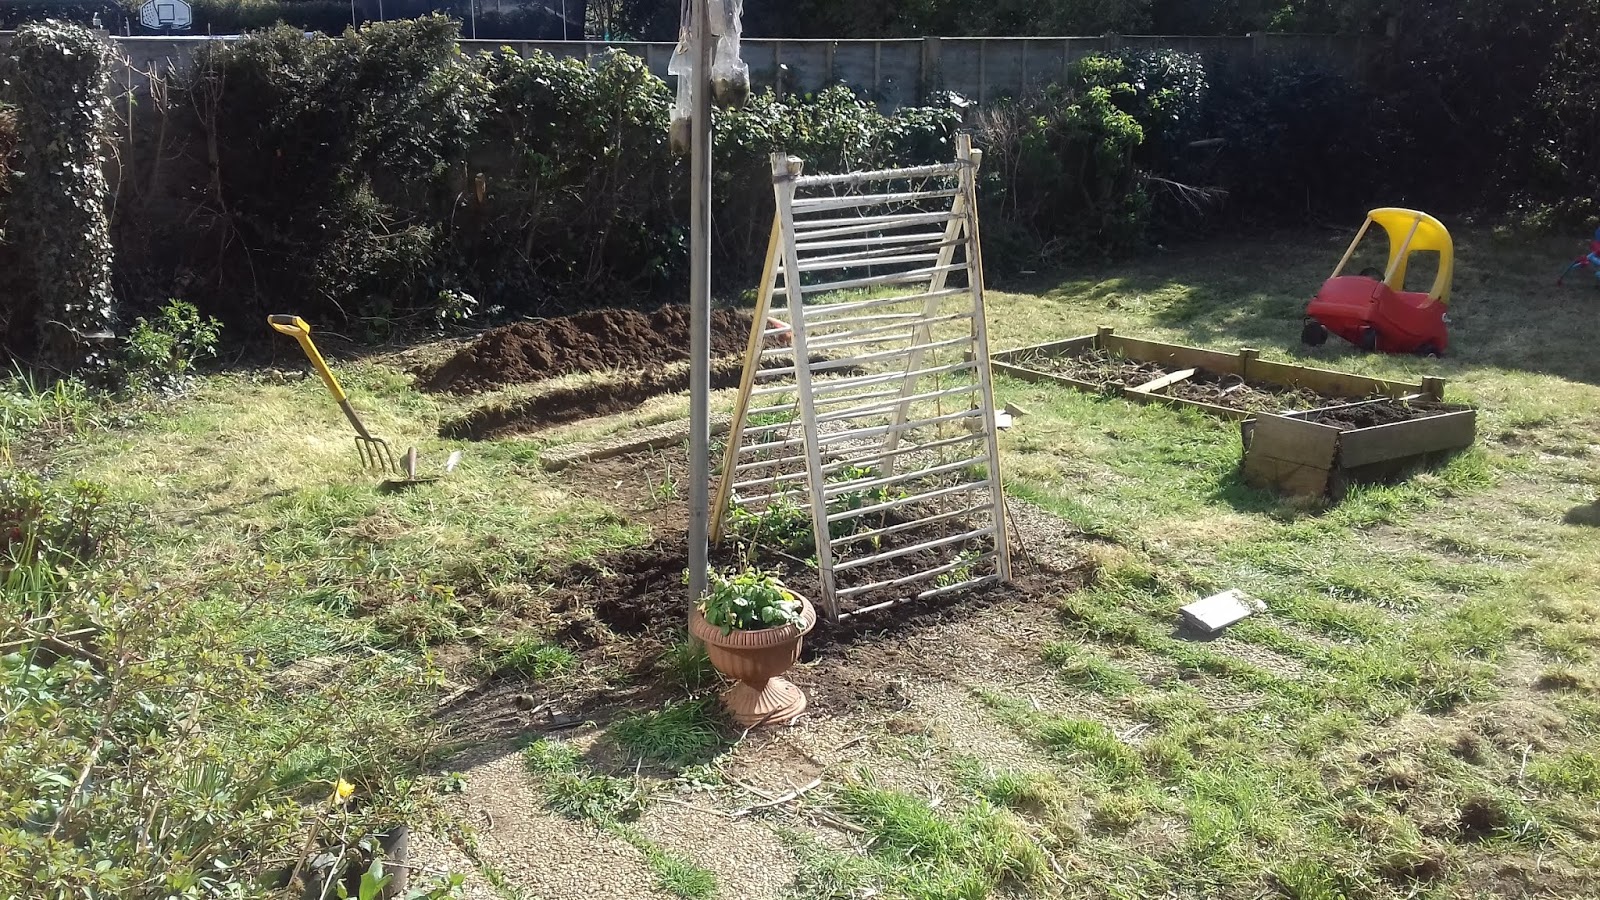
I've been busy in the veggie section of our garden (which I will probably end up adding flowers to as well, because they attract pollinators and insects that defend our crops) too. There's still lots to do, but already it's starting to take on victory garden vibes.

As you might be able to see, the big bed at the back near the toy car (the one we built out of an old bed) survived the winter, but the one I bodged together out of an old chest of drawers last year did not (I would've been astonished if it had) - we may try to hold it together for one more year, I'm not sure yet. 

Peas:

The peas (bed closest to us with the frame made out of an old cot) that we tried overwintering have mostly survived, much to my surprise. The only ones we lost were those that got damaged when high winds blew the frame over.  I took it down and packed it away after that, and have just reassembled it today. The overwinter pea plants that survived have just started to grow again after going into stasis over winter, so I put the frame back up and laid the plants on it so they can grab hold and start themselves back up. I've also planted a some more seeds today and will again next week so we get a succession of peas rather than one huge glut, just like with the lettuces. 

Potatoes:


So last year I attempted to grow potatoes in bags. They seemed to grow well. I then completely forgot to harvest them. Forgot I evenue had them. I discovered the bags yesterday but they've got new growth on them so I'm leaving them for now and we'll empty thwm at the end of the season and see what's what. Remind me.

This year I decided I wanted lots of potatoes so we are doing them in the ground. See the big trench at the back of the picture, that looks "worryingly like a grave" (or so said my husband,  who was digging it for me)? That's where our potatoes will be. They're currently"chitting" - ie growing eyes - on my daughter's windowsill. Pro-tip: do not teach your primary school age children the word chitting unless they are very good at pronouncing the sound "ch"

We need to make the trench a little deeper so we have a good heap of soil next to it. Then our seed potatoes will go on the bottom of the trench and be covered with just a tiny bit of earth from the heap. Each time the leaves poke through the soil, we will cover them up with more from the heap (and maybe some well rotted manure or compost if I can get hold of some) and when we've used up all of the earth from the heap we will let them grow. When the foliage dies off, the potatoes are ready to be dug up and harvested.

Fruits:


The little sucker I transplanted last year has survived winter and even has a little blossom on it.
I was concerned that it may not be a Victoria plum, because the parent tree was grafted, but the blossom looks similar to me.

I'll have to keep on top of the tree so it doesn't turn into a monster like its' mum, but I'm pleased it survived the transplant. I may net this blossom against the birds since they have the whole giant beast tree to strip of blossom.

I left the pot of strawberries out over winter (you can see them in the terracotta coloured pot in front of the pea frame in the victory garden pic above). They survived the mild winter well and are flowering already. I don't think it's warm enough for the flowers to develop into fruit, but the bees and ladybirds seem to love them.


I think that's everything up to date for now. I'm still waiting on the apple blossom and hoping to get some deliveries for my garden soon (though deliveries have been unavoidably delayed what with the global pandemic we have going on), and there's still a lot to do so I'm sure my posts will be coming thick and fast as spring goes on.

I know from my stats that a lot of people are suddenly very interested in growing food on a budget, and I think that's fantastic. It's great for mental health to get outside in nature, even if it's just on your balcony, and it wont hurt to take some pressure off the food supply while things - and therefore people- are still uncertain. It's also a brilliant opportunity to bond with your kids while sneakily teaching them all sorts about the food chain, beneficial insects, how ecosystems work and even literacy and maths (reading seed packet instructions, writing labels, counting seeds, measuring space between plants) while also tricking them into fresh air and exercise, and getting them interested in trying more fruit and veg. Gardening is a great homeschooling projet,  and is just as valuable as learning about historical battles or trying to teach your child algebra you barely understand yourself. If you're on lockdown, growing veg is the perfect family activity to do together. They'll catch back up with the academic stuff later, but they'll never forget the time you spent together or the skills you taught them.

It can also be a bit daunting for beginners though, so if there's anything you'd like to see  an in depth post on, or any terms you'd like explained, let me know in the comments or on twitter and I'll do my best to answer for you.

In the meantime you can see the little garden things I don't always share here on the hashtag #VsBoringGardenTweets on twitter. Happy growing!