Showing posts with label #VsBoringGardenTweets. Show all posts

Thursday, 2 April 2020

Planting Potatoes


I am finally well enough to garden again, after 3 long weeks of being housebound and worrying I'd miss the entire spring, so today was an absolutely exhausting catch up day in the garden, which mostly focused on planting the potatoes.

As I said in my most recent post, the potatoes have been chitting (growing "eyes") on our windowsill for a week or two now.  I know some people start them off in the dark, perhaps planting potatoes that have sprouted in the cupboard, but I find the long, pale shoots that come off those potatoes to be weak and snap off easily. We start ours on the windowsill and the shoots grown green and strong, and not as long as shoots that have been searching for light.

We tried growing potatoes in bags last year,  but I honestly forgot all about them come harvest time because they were tucked away under the fuscia. I also had a lot more seed potatoes this year, and not very many suitable bags or containers, so I decided to grow them in the ground this year instead. It is more labour intensive and takes up more space but I'm hoping that will mean much higher yields.

First step was to dig a trench. This took us a couple of days (because we had all been poorly and didn't want to overdo things), and looked suspiciously like we were digging a grave.

We stripped the turf and laid it upside down next to the bed. It'll rot down over the season and turn into lovely rich loam,  which the worms will love. Then we dug using a fork to loosen the soil and a shovel to hoof the newly loosened soil into a pile next to the trench. I won't lie - it was hard work. Probably really good for your abs, but we spread it over a few days so we would be able to walk when we were done.

Once we had the trench a good spade and a half to two spade depths deep, I chucked some cut grass in the bottom of it. Potatoes are greedy, they like plenty of nutrients, and as that breaks down it will feed the plants from the bottom up. Because potatoes are so greedy, I also added as much of my home made banana peel fertiliser as I had in the house, as a slower release fertiliser.
After my grass and banana peel mix was added, I put a small amount of shop bought compost down. Really didn't use very much - the bag you can see in the first picture is a 20L bag.  I used all of it for the potatoes, using around a quarter of it (so approx 5L) for this stage. 
Then I laid my seed potatoes, with the little eyes pointing upwards, on top of the compost. Some people cut their seed potatoes in half and leave them to heal for a couple of days before planting, especially if they are large and have plenty of shoots /eyes growing. I didn't do that, because I had plenty of seed potatoes for my space (in fact, I've probably planted them a bit too close together).

Once I had all my seed potatoes in the trench, I covered them over with a handful of compost each, then covered the whole bed with just a little bit of the soil I had dug up to make the trench, and kept in a heap next to it.

As you can see in the above picture, the trench is far from full; there's only just enough topsoil there to cover the seed potatoes up. 

As the potato plants grow and their green leaves start to pop up, they will need to be "earthed up" -ie covered in soil - a few times to encourage them to make tubers. So at this point I took what was left of my small bag of compost - about half of it - and mixed it with the heap of topsoil I have next to the potato trench. 

As the potato plants grow, I'll keep scooping the topsoil/compost mix over them until I can't pile it any higher. Then it'll just be a case of allowing them to do their thing until harvest time. We'll see how it goes.

I got loads more done in the garden today, including making a sort of fence to keep the dog out of my veggies (he never digs where I want him to), planting lots of beneficial and edible flowers, and tending my upcycled bookcase and bed to bed beds, but I'm too tired from doing all of that today to write a post on them right now, so I'll come back and link to them in the next few days.

If you have any top tips for planting potatoes, let me know about them in the comments section. Happy growing!


Thursday, 26 March 2020

Spring Forward


It's that time of year again, the garden is waking up and starting to stretch, so it's time to blow the dust and cobwebs off this blog and let you know what I've been up to.

It's a strange start to the season, in part because here in the south east of the UK we didn't get much of a winter, but mostly because Coronavirus has been keeping us at home. No pottering round the garden centre to steal ideas and rescue neglected discounted plants, no foraging for wild garlic in the woods, no bargain hunting round garage sales and free ads. Luckily what I do have is some seeds, some outdoor space, and some bored children. We can create a lot out of that.

I always planned to kick things up a notch this year, in terms of how much I was growing, but the fresh food shortages in the shops have given me added motivation, so I'm probably going to plant much more than I'll be able to keep up with. I wouldn't recommend that if it's your first year - plant a couple of bits that you enjoy eating and can give lots of time to. You'll likely have a better crop because of it. I'm ignoring my own advice because it's my second year, I already had a little bit of veg growing experience before I started last year, and I'm envisioning a long season ahead with nothing much else to do.

On the windowsill:


I don't actually have a huge amount of suitable windowsill space in my house but I'm making do with what I have to start seeds off. I used some small pots to start off some courgette, butternut squash, and pumpkin seeds, as well as some tomato seeds. The squash family are a joy to start from seed and a great project to do with toddlers and young children because the seeds are big and chunky, they germinate quite quickly, and once they start off they grow so fast you can almost see it happening. Great for people who need a bit of instant gratification.

Beginning to germinate (about 3 days after sowing)

The next morning (4 days after sowing)

The day after that (5 days after sowing)

They'll probably get overcrowded quite quickly, and I'll need to move them. I sowed 2 seeds per pot expecting a poor germination rate because it was cheap seed (from Wilko) but they all seem like very happy seedlings.

As well as my squash plants, I've also sown some tomatoes, which are starting to sprout:

As you can see the seedlings (and their seeds) are a lot smaller and more delicate than the squashes, so it might be difficult for little fingers to plant individual seeds.  Don't worry if you end up with loads in the pot like this, we can just pick out the smaller, less healthy looking seedlings and grow on the ones you want.

The other thing on my windowsill right now is cut and come again lettuce. I had run out of pots but I had a rubbish old loaf tin that I never used (because it doesn't let the bread cook evenly) and I figured it'd do. I like reusing and hate sending stuff to landfill. 

I put a few stones in the bottom of it for drainage but you probably don't even need to do that because lettuce is a shallow rooted plant and the tin is deep, so the roots are unlikely to ever be waterlogged.
I will try and remember to turn this every day so it doesn't go leggy from the lack of light, and in a week so so I will sow some more seed on the bare patches of soil in the pot so I get a longer harvest season. This is a fab little crop to grow because , as a cut and come again variety, it will benefit from a good trim every now and then, and will regrow when it's cut, giving us several little harvests. Much better than having a row of iceberg lettuces all ready for harvest at once and being sick of the sight of lettuce halfway through day 2 after harvest.

In the garden:


We have been busy in the garden too. The grass has had its first cut of the year, and I've been trying to stop the dog scratching one particular area of the garden (while also making our pollinator friends happy) by planting some perrennial flowers - primroses and daffodils mostly. 

We picked them up on special offer at the garden centre a week or two before everything shut down, because yellow is my daughter's favourite colour and she wanted something to brighten the garden and her spirits. Then my youngest son brought home some daffodils from school for Mother's Day, so I added them in too. In between I have scattered some seeds I saved from last year's marigolds. They were F1 hybrids, which don't always produce good seed, and I'm not sure if I harvested them at the right time, so we will see if they come up or not, but if they do it should make a great area for our bees and butterflies.

And hopefully, because they're supposed to be perennials, most of these flowers will come back year after year.

I've been busy in the veggie section of our garden (which I will probably end up adding flowers to as well, because they attract pollinators and insects that defend our crops) too. There's still lots to do, but already it's starting to take on victory garden vibes.

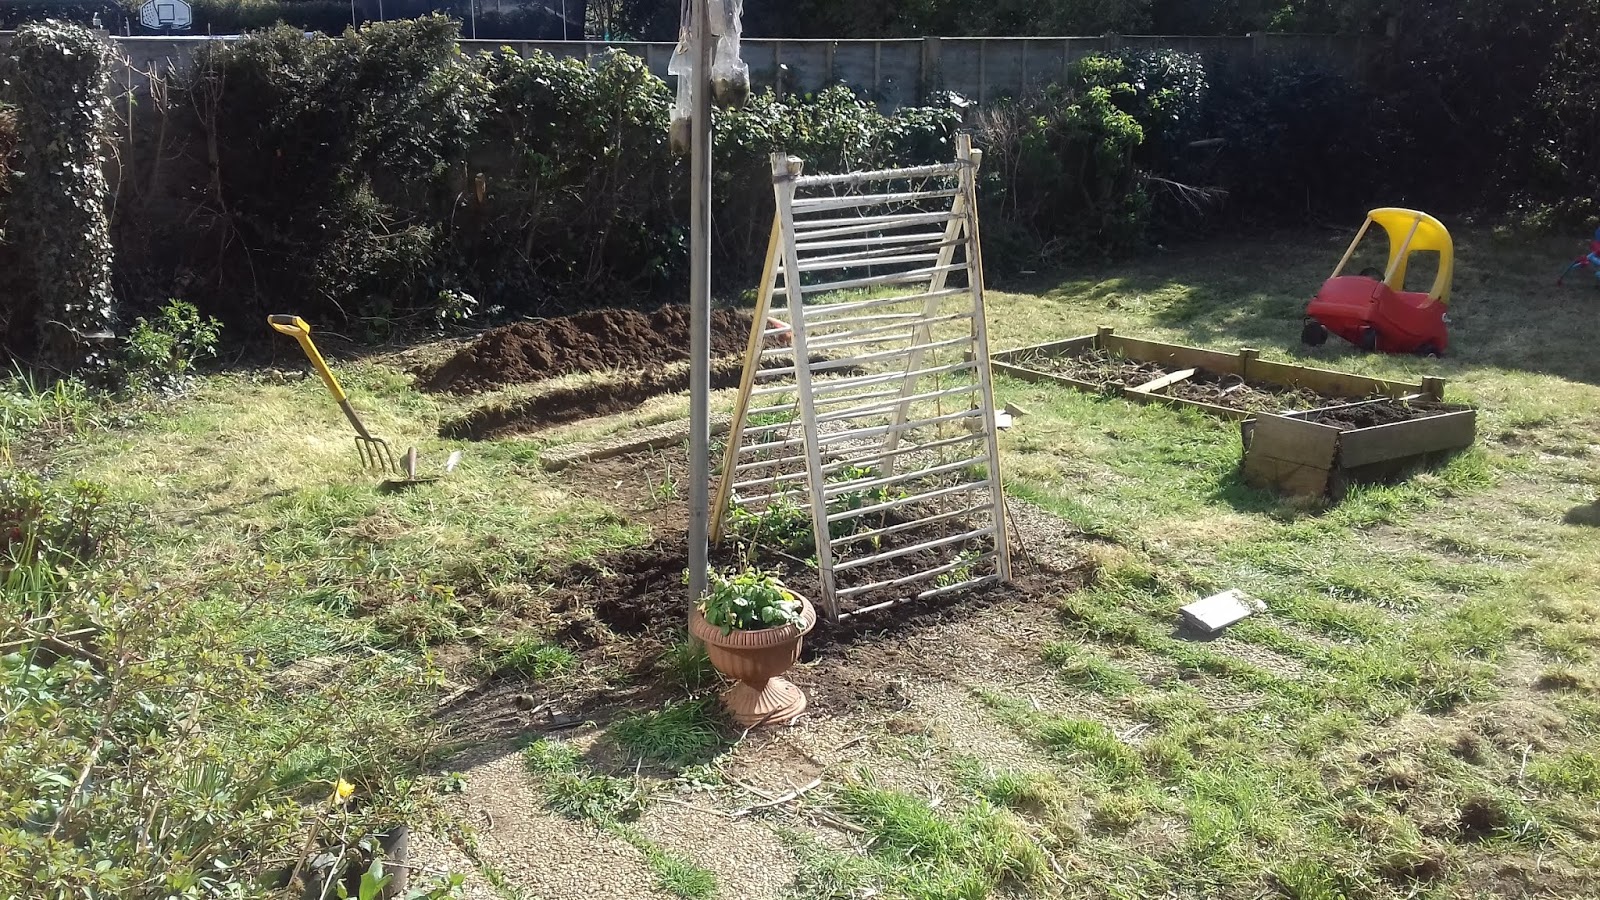
As you might be able to see, the big bed at the back near the toy car (the one we built out of an old bed) survived the winter, but the one I bodged together out of an old chest of drawers last year did not (I would've been astonished if it had) - we may try to hold it together for one more year, I'm not sure yet. 

Peas:

The peas (bed closest to us with the frame made out of an old cot) that we tried overwintering have mostly survived, much to my surprise. The only ones we lost were those that got damaged when high winds blew the frame over.  I took it down and packed it away after that, and have just reassembled it today. The overwinter pea plants that survived have just started to grow again after going into stasis over winter, so I put the frame back up and laid the plants on it so they can grab hold and start themselves back up. I've also planted a some more seeds today and will again next week so we get a succession of peas rather than one huge glut, just like with the lettuces. 

Potatoes:


So last year I attempted to grow potatoes in bags. They seemed to grow well. I then completely forgot to harvest them. Forgot I evenue had them. I discovered the bags yesterday but they've got new growth on them so I'm leaving them for now and we'll empty thwm at the end of the season and see what's what. Remind me.

This year I decided I wanted lots of potatoes so we are doing them in the ground. See the big trench at the back of the picture, that looks "worryingly like a grave" (or so said my husband,  who was digging it for me)? That's where our potatoes will be. They're currently"chitting" - ie growing eyes - on my daughter's windowsill. Pro-tip: do not teach your primary school age children the word chitting unless they are very good at pronouncing the sound "ch"

We need to make the trench a little deeper so we have a good heap of soil next to it. Then our seed potatoes will go on the bottom of the trench and be covered with just a tiny bit of earth from the heap. Each time the leaves poke through the soil, we will cover them up with more from the heap (and maybe some well rotted manure or compost if I can get hold of some) and when we've used up all of the earth from the heap we will let them grow. When the foliage dies off, the potatoes are ready to be dug up and harvested.

Fruits:


The little sucker I transplanted last year has survived winter and even has a little blossom on it.
I was concerned that it may not be a Victoria plum, because the parent tree was grafted, but the blossom looks similar to me.

I'll have to keep on top of the tree so it doesn't turn into a monster like its' mum, but I'm pleased it survived the transplant. I may net this blossom against the birds since they have the whole giant beast tree to strip of blossom.

I left the pot of strawberries out over winter (you can see them in the terracotta coloured pot in front of the pea frame in the victory garden pic above). They survived the mild winter well and are flowering already. I don't think it's warm enough for the flowers to develop into fruit, but the bees and ladybirds seem to love them.


I think that's everything up to date for now. I'm still waiting on the apple blossom and hoping to get some deliveries for my garden soon (though deliveries have been unavoidably delayed what with the global pandemic we have going on), and there's still a lot to do so I'm sure my posts will be coming thick and fast as spring goes on.

I know from my stats that a lot of people are suddenly very interested in growing food on a budget, and I think that's fantastic. It's great for mental health to get outside in nature, even if it's just on your balcony, and it wont hurt to take some pressure off the food supply while things - and therefore people- are still uncertain. It's also a brilliant opportunity to bond with your kids while sneakily teaching them all sorts about the food chain, beneficial insects, how ecosystems work and even literacy and maths (reading seed packet instructions, writing labels, counting seeds, measuring space between plants) while also tricking them into fresh air and exercise, and getting them interested in trying more fruit and veg. Gardening is a great homeschooling projet,  and is just as valuable as learning about historical battles or trying to teach your child algebra you barely understand yourself. If you're on lockdown, growing veg is the perfect family activity to do together. They'll catch back up with the academic stuff later, but they'll never forget the time you spent together or the skills you taught them.

It can also be a bit daunting for beginners though, so if there's anything you'd like to see  an in depth post on, or any terms you'd like explained, let me know in the comments or on twitter and I'll do my best to answer for you.

In the meantime you can see the little garden things I don't always share here on the hashtag #VsBoringGardenTweets on twitter. Happy growing!

Sunday, 20 October 2019

October Gardening


Hi fellow clueless gardeners!

I didn't post anything last week because it hasn't been a very visually interesting few weeks in the garden, but just in case you're following along with me, I thought I'd give you an update on what I've been doing in the garden this October.

Most exciting news first - the peas that I planted to overwinter at the end of September have sprouted!

I didn't expect them to - it feels like entirely the wrong time of year for seeds to be growing - but I have read on a few sites that you can grow peas over winter to be ready in March/April, during the hungry gap. I'd like to be able to extend my growing season as muh as possible so, skeptical as I am, I decided to give it a go. The variety I see associated with overwintering most often is one called 'Meteor' - I bought a pack of those and sewed about 20 of them straight into the ground in my pea bed. We'll see how they get on once the frosts start.

I've also planted some garlic, and some spring flowering bulbs (daffodils and snowdrops). I planted them in different areas - the garlic going into the border where the courgettes had been, and the flowering bulbs going into the area where my dog keeps digging and nothing seems to grow well. I've had a lot of luck with bulbs in the past and they've always seemed to grow well even in poorer soil so I'm hoping they will do well here, and the dog will stop digging quite so much. That area is currently really swampy due to all the rain we've had and the dog's churning,  but some grass is starting to take there so I'm hopeful it'll recover a little over winter.

I plant both my bulbs and my garlic in much the same way (although with garlic I'm mindful of spacing and tend to plant in rows, whereas with the flowers I chuck them on the ground and plant them where they fall for a more natural effect). I stab a butter knife into the ground (I keep one specifically for this, it's my take on an athame/boline), wiggle it about a bit, then drop the bulb in the resulting hole  and cover it up again. I have very loose, sandy soil though, so it's very easy for me. If yours is more clay or chalk based, or is very compacted, you may need to dig with a hand fork or similar to create a loose pocket of earth about twice the size of your bulb or clove so it can divide and spread its roots out easily.

This month has also been all about cleaning up the garden for winter. By that, as you know, I don't mean picking up every bit of leaf litter and clearing out every stalk. Mother Nature needs some of that to shelter beneficial insects, feed the birds, and nourish the soil. But it does mean inspecting the fruit trees for damaged branches once they've been harvested, and giving them a prune if needed to stop frost damage or disease setting in over winter. I also removed the diseased leaves of my courgette plants and disposed of them to keep them from infecting my compost, and over the next few days I'll be giving all of my tools a really thorough clean, first with soap and water, then with vinegar/alcohol so that they're ready to go in spring when I'll be working with delicate younger plants.

One of the fun things to do in the garden at the moment is save some seeds. The birds have already started this off for me with my marigolds

I'm not sure the picture shows it very clearly, but the dead seed heads have been pulled open and there are heaps of marigold seeds on the ground.

I'm not actually sure how the flowers from these seeds will turn out because I think they were F1 hybrids. The seeds are unlikely to produce the same flowers as their parent plant, but I've saved some seeds anyway out of curiosity. 


It was super easy to do, I just waited until the dead heads were dry, peeled back the outer layers of the plant heads and found all the seeds inside. There were so many just from a few heads that I'm also going to try experimenting with hanging the dead heads upside down from my tree branches over winter to see if the birds eating at them and wind battering them will help spread the seeds in a low effort, natural way.

I let the seeds dry out on a sheet of paper on a sunny windowsill, then popped them into an envelope ready for spring. If even a quarter of them germinate and flower we will have some very happy bees next summer.

I've still got to plant my shallots (and fast because we are getting very late in the season, but I've been lazy), which I'll do in a similar way to the garlic, but other than that I think the garden is mostly quietening down for winter now. All of our first year crops have been harvested  (and mostly eaten, although we are still working our way through the windowsill-ripened tomatoes), and beds have been cleared if annuals and mulched to nourish the soil ready for planting next year. I'll be "harvesting" some yew, ivy, and holly from my garden edges for our yuletide wreath in December,  but most of the garden work now is taking place in my head and on the page as I plan next year's growing season.

One ongoing piece of maintenence though is the new raised bed. Because I'm attempting to fill it with home made compost, in a sort of lassiez-faire lasagna bed, I will need to keep topping it up throughout the winter. I'm adding (well covered) kitchen scraps, shredded newspapers, cut grass, twigs, dead annual plants (that aren't diseased), toilet rolls tubes that have been cut into fine strips,
And the dead heads of the marigolds that I had removed seed from, as well as sweet chestnuts shells from my latest foraging session in the woods.

I was also lucky enough to be able to swap a bag of windfall apples for a bag of well rotted horse manure. Hopefully that'll be arriving in the next few days so I can add it to my beds and mulch the fruit trees with it.
When it arrives I will tell you how it came about. I never thought I'd be happy to receive a bag of shit, but that's what gardening does to a person.


Monday, 30 September 2019

From Bed to Bed


I've finally gotten around to writing up a quick how to about raised beds. It didn't take long at all (or rather it wouldn't have, but I'm married to an engineer, so it got complicated!), and is a fairly simple weekend project to get you started. I'll be showing you how I went from this:


To this:
And what still needs to be done to make it ready for planting.

What do I need?


You can make a raised bed out of just about anything. If it has sides and holes for drainage, you can make it into a bed. I made these out of some old drawers that the children had overstuffed with clothes and broken, and they worked brilliantly for my carrots for one year. I didn't construct them very well though, or treat them at all, so when I tried to move them this year they fell apart. 


I may still attempt to save the bigger one with a lot of duct tape and hope. When making these I literally removed the bottoms, stapled the drawers together and filled them up with compost. If I were doing the same now I would secure them with 4 stakes at the corners, and screw the sides to the stakes. I'm sure that would work a lot better than my quick bodge up from last spring.

You can make raised beds out of anything you have laying around, it's essentially the same as having a great big planter.  I had an old broken double bed and the slats were the perfect length for what I had in mind, so I used those, but you can use railway sleepers, corrugated iron or plastic, bricks, old drawers, shelves, anything you like. If you decide to use wooden palettes, first check to see if they've been heat treated. The ones that haven't may have been chemically treated, so might leech toxins into your soil. You can check by looking for a HT on the stamp somewhere on the pallette. It'll look something like this:


Once you start looking into toxins and raised bed building you can find a lot of information, some of it conflicting and all quite intimidating. I've generally grown food in recycled old furniture though, and I'm ok. Your mileage may vary so if in doubt, leave it out of your garden and ask a more knowledgeable gardner than me - they'll almost definitely be happy to give you advice.

You'll also need a screwdriver, screws, and if you're making a large bed, a friend to help you move it around.

Why Raised Beds?


A couple of people have asked me why I use raised beds in my garden when I already have great, easy to work soil. It's a fair question.

I actually do a mixture of raised beds and straight into the ground. You don't have to use them and if you put the work in your garden will reward you whether you grow in the ground, in raised beds, in planters or from hanging baskets. But there are advantages to using raised beds.

  • Soil Health and Quality.

Raised beds actually are a really easy way of improving soil health in a specific area. If you have chalk or clay soil that can be difficult to work and compacts easily, you can add nutrients in the form of mulches and composts to make it easier to dig over. If you, like me, have sandy soil that dries out easily, you can added organic matter to help it retain moisture.

  • Weeding

Weeding is soooooo much easier in a raised bed. Because the soil isn't as compacted, it makes pulling young weeds that have self seeded super easy to do by hand. And if you start your bed with a decent weed suppressing layer before adding in your growing medium, it's much harder for them to come up from under ground.

  • Defining the area

This may not be as important to you if you are the only person using your garden, but I share mine with 4 children (and their friends), a dog with a fondness for digging and scratching at the ground, and a husband who likes to mow the grass but doesn't know a buttercup from a butternut and might well mow over my veg patch without careful supervision. Having your veg in raised beds stops people from walking over the soil and compacting it down, making it much easier for you to work with hand tools and for your seeds to easily push through to sprout and form their root systems.

  • Extended growing season
Raised beds warm up much quicker than the ground, so you can plant stuff out earlier.


How to make your raised beds


As I said, this can be as simple or as complicated as you want it to be. The basic principal is to have 4 sides, anchored with stakes into the ground. Size doesnt matter, just make sure you can comfortably reach the middle of it so you won't have to walk on it to weed the middle of the bed, and don't let it be so long that you're tempted to walk across it instead of around it. We used an old bed frame that has been sat in the outbuildings for years because 1) it's too big to fit into my car to take to the tip and 2) I knew I wanted to upcycle it in some way but didn't know what I wanted to do with it.

I did intend to go and buy some stakes - they're not very expensive - but when I told my husband I was trying to build raised beds as cheap as possible he took it as a challenge and decided to make stakes from the part of the bedframe I wasn't using. I'll show you the different stages of his and try to explain how you can adapt it if you aren't using a broken bedframe.


One of the hardest parts of the project was trying to get the slats out of the bed without breaking them. There's no easy way to do that, especially if the bed frame has been sitting somewhere damp and the screws are rusting out. Taking it slowly, using a normal screwdriver (the electric one was making the screws disintegrate) and swearing at it loudly and often, seems to be the best method.

If I were doing this by myself I'd have screwed each plank to a stake in a rectangle and called it done. But, as I said, my enthusiastic engineer husband took over. So he used the existing posts that make up the sides of the bedframe to make the stakes. 
It's tricky to see in my pictures but the bed frame was shaped in such a way that making the corners was fairly simple, but a little different to how you'd do it with separate stakes.  It was easier for us to cut the bedframe around the last two, which will make up the head and foot of the bed, than to try and remove them. We didn't cut flush to the bed slats, because we will need that overhang to secure it into the ground.

Usually if you're making a bed with planks and stakes, you'll want your stakes on the inside of the bed, not the outside as we have done. That was purely us adapting the design to suit the materials we had. If you pop yours on the inside, only have them overhanging one edge (to go into the ground), and have the other edge of your stake be just a couple of inches below your topmost plank,  so you can cover it in soil and don't need to worry about sanding it down.

Once the corners were done, we attached the side planks to the existing "stakes"

And we had the frame of the bed.

This whole process would've been a lot easier if we had bought new screws. My husband decided to take the "frugal" part of my blog really seriously though, and decided to use a mishmash of screws he found lying around the place. They weren't great, but they did the job. An electric screwdriver and a drill made it a lot easier, but new screws would've made it easier still.

I made mine this length and height because that's how much wood I had, but you can make yours higher if you like, just attach your next plank up to the stakes too. Just bear in mind that the higher it is, the more it'll need to be filled up.

Placing your bed


Top tips for placing your bed mainly involve finding a flat place for it. You want your bed fairly level because otherwise one side will get very dry and the lower side may become waterlogged.

Once you've found a flattish spot for your bed, preferably in the sunniest spot of your garden, lay your frame out and mark the ground around the edge. We used lolly sticks, but you could mark it with a spade or a hoe, or even spray paint or string. Then move your frame out of the way and dig up the grass that's there already.


This bit is horrible, there's no getting round that. The only saving grace is that you don't have to dig too deep, just enough to get as many grass roots out as you can. Grass is hardy, and very invasive (that's why it's everywhere) and taking time to do that now will save you so much hassle further down the road when the growing season starts.

Once you've cleared the ground lay your bed frame onto the ground and slowly (so as not to rattle out all your screws), hammer your stakes into the ground. If you have very compacted or clay type soil, you may find it easier to dig a hole out for the stake with a crowbar.

We then sanded down the stumps that were still above ground, using an orbital sander  and grinder my husband uses for work.  If your stakes don't stick out above your planks, you won't need to do that because they'll be covered in soil. If they are a little big you can smooth them with sandpaper but it will take longer.

You can fancy it up by painting it, or make it last longer by lining the sides (not the bottom!) With old compost bags, if you like, but it isn't essential.

Now you've made your bed, well done! But you can't quite plant in it yet, it'll need filling up with compost first.

How to fill your beds for free (ish)

So you've built your bed from scratch and you've put your feet up for a well deserved brew and a browse at compost online. And then you realise, to fill this bed with shop bought compost is going to cost you an absolute fortune. Don't panic, even if you haven't started your compost bin yet or don't have space for one, you can still fill your beds for virtually nothing, so long as you've started in autumn or winter. 

I definitely can't afford the 8-10 sacks of compost it would take to fill this beast of a bed, so I'm going to be using this method as well.

Remember when I told you to save all your prunings to start your own bug hotel?  Well now we get to transform them with garden magic into compost.

I started by lining my bed with newspaper (ignore the diagonally placed plank in the middle, that's just an offcut I used to brace the bed until I fill it because the screws I used weren't great and it's a little rickety)
I lined the bottom of mine with a few layers of newspaper. You could use cardboard, or whatever you have around the place.  You could even use some fancy-pants weed suppressant membrane if you happen to have some. I wouldn't recommend using plastic for the bottom of your bed, because it can make everything soggy and cause your plants to rot from the roots. If you have a large sheet of black plastic though, don't throw it away just yet. When your bed is full you can throw it over the top of your bed to stop weeds getting in and warm the soil before planting.

Once you've got your first layer down, give it a good water. Nothing can grow without water and that includes your soil. You want it to be a living organism, full of worms and bugs, and life, not a sterile thing. Healthy plants start with healthy soil.

Now you can start chucking in whatever organic matter you have. All the garden trimmings can go in there (but maybe avoid invasive perrennial weeds like bindweed that seem to be indestructible, or poisonous plants like Yew that retain their toxicity after they've died down), leaves in various states of decay (provided they arent diseased), cut grass, veg or fruit peelings (go easy on the citrus), even brambles and nettles can go in there (I tend to avoid putting brambles in mine, despite having an abundance of them, because I garden bare handed and the thorns don't break down brilliantly). You can  split open spent teabags and chuck the tea leaves in, add coffee grounds, ground eggshells, anything that would go in your normal compost bin. 

Avoid things like meat, fish, or manure from cats or dogs. You can add in rabbit manure/used sawdust from your hamster, etc, but generally speaking don't add in poop from animals who eat meat. It can attract rats and can harbour diseases like Roundworm or Toxoplasmosis that can survive in your soil and pass onto you.

 You want a good mix of "greens" (veg peelings, etc) and "browns" (cardboard, newspaper, twiggy bits). Don't put huge great big bits in, if you have larger branches and things chop them up first. Add in spent compost from your old planters (for example I'm using the tired out compost I grew potatoes in this year), sawdust from making the bed, wood ash, last year's wood chip mulch, anything you have hanging around. Give everything another good water.

Only use this lasagne method of planting this side of the fallow season. You want to give your veg peelings and things plenty of time to break down  before adding plants, at least 4 weeks in the winter, preferably longer. Exceptions to this are if you intend to plant a cover crop/green manure for winter. I'll talk you through that in a sec.

It shouldn't smell as it breaks down, if it gets pongy give it a stir about with a big stick and throw another layer of shredded newspaper, paper (not shiny printed paper with lots of colours) or grass on top.

A few weeks after you've filled it with this lot,  you should notice it start to sink down and look like it needs filling again.
Thats great, it means the worms are working on breaking it all down into lovely rich compost for you. At that point you can start the process over.

When it is very nearly spring, and I'm sure it's all broken down nicely, I'll top it with a little shop bought compost, just because that contains perlite (to help retain moisture) and added slow release fertilisers.  You don't have to do that though, as long as you keep adding stuff and watering it over winter if it gets very dry, you should have a decent planting medium by spring for pennies.

Once I've got my bed filled I like to cover it to stop weeds getting in. I usually do that with some cardboard, which you can either remove before planting or water thoroughly and plant directly into. You can use a sheet of black polythene (which has the advantage that it'll help warm your soil even quicker) to cover your bed or you can plant a cover crop. 

Cover crops, such as clover, aren't intended for consumption and are just there to hold the soil structure, and add nutrients like nitrogen into the soil. They also help suppress weeds by taking up all the space. When spring comes along you can just dig them until the soil for added nutrients and start with a blank slate.

Composting  is a huge subject,  and probably one for a different post, but there's loads of info out there about what you can put in, and not all of it is conflicting! You may want to add more of a particular item depending on what you're growing (for example if I wanted to grow very nitrogen hungry crops like peas or leafy greens, I'd add lots of nettles). You can really geek out over compost ingredients but I try not to overthink it. Just throw stuff in, try to keep it balanced, and see what works. My gardening style is very much trial and error, and I'm very much a novice, but it has worked for me so far.

What are your favourite composting methods? Have you ever tried lasagne planting in a raised bed? What worked for you? Let me know, and if you have a go at building your own raised bed, I'd love to see it.

Happy growing!

Apple Harvest


I know, I know, you were expecting a post on upcycling a bed into a raised bed this weekend.  I have actually finished that project now and it looks great, but I've been so poorly with tonsilitis that I've not had a chance to write it up yet. I'll try to get that written up this week ready for you to have a go next weekend if you want to.

In the meantime thought I'd pop my head round the door and show you our latest harvests.

After the hackening our tomatoes have started to ripen. I managed to catch a picture of some of them before they were devoured by my children. People keep asking me if they taste better than supermarket ones but I couldn't tell you because the children haven't let me have one yet!
As you can see, some of them are still green and on the vine.  That's because I accidentally broke that vine when trying to reach a ripe tomato.  I've put it in the basket with some ripe ones to ripen on the windowsill. In the next couple of days, before the frosts arrive, I'll be cutting all of the vines and hanging them in the window to ripen. Those that don't ripen will be made into green tomato chutney. I've never tried to do that before so if I end up making some I'll talk you through the process.

Our main harvest today was apples.

It's hard to believe all of those apples came from one dwarf tree! I'll be saving the best to try and store for the children's packed lunches, but will be making most into apple pies, apple sauce, and pectin for jams  and jellies (if I can work out how to store it, since we have no plums this year to make into jam). I really want an apple press! Pressed apple juice is my favourite, and cider one of few alcoholic drinks I actually like.

The tree looks relieved to have given up her fruit, she was so laden down her top branches were almost touching the floor. 

I've left a few of the more manky looking apples at the base of the tree to rot down over winter and feed the insects (so therefore the birds) and the soil, and after picking them all I gave the tree the same organic feed to give to the tomatoes, mixed with rain water. That's not a gardening tip - it's really more of a witch thing to want to thank the garden after harvest - but I've always given my trees a feed or a mulch after they've given me fruit, and they've always seemed grateful for it. Just remember if you're mulching a tree - whether that's with cut grass, bark mulch, leaf mold, or manure - not to let the mulch touch the trunk/stem itself.  It'll make the trunk soggy and that could lead to disease or damage. Leave the trunk a little room to breathe, the worms will take the mulch down into the soil for you to release the nutrients around the roots. 

Now is also a good time to check your fruit trees for any signs of damage (when the tree is heavy  with fruit and it's windy you can end up with split or snapped branches) and tend to it now before winter sets in.

It's new moon here (or close enough for my purposes) so I'm going to try planting some peas to see if they'll overwinter. I'm doubtful but I've read up on it and the variety 'Meteor' is supposed to be very hardy, so I'll let you know how it goes.

Happy growing!

Saturday, 21 September 2019

The Hackening


It's been a busy weekend in the garden, tidying things up and trying to ripen fruits before the first frosts, harvesting what we can, and building the big raised bed for next year. I'm super excited to show that to you, it's another garden upcycle and I'm pleased with how it turned out. But it's not quite finished yet, so I'm going to be sharing that one with you next week [edit: find it here!] If you're planning on growing along with me next spring, now is a great time to start thinking about where you're going to plant things, because a little work now will save a lot of work later. We'll talk more about that next week though. 

Despite the growing season starting to wind down, there's still lots to be done in the garden in September. 


Another Tiny Harvest


We've been busy harvesting. Even our toddler was able to help with that, and he really enjoyed pulling up the carrots.

I grew them in a raised bed made from an old drawer this year. It was great in that the fine, less compacted soil prevented forking, and they were ridiculously easy to pull up. I didn't space them brilliantly, and I could've easily grown another row. I'll definitely do them in my raised bed next year, but I'll plant a lot more, and space them more carefully.  We didn't have any signs of carrot fly at all; whether I can attribute that to the fact I didn't bother thinning them, or if the height of the beds helped, or if we just got lucky, I can't say. 

Another job this week was to clear the dead sweetpeas from the cot bed frame and collect their seeds, ready for the overwintering peas to go into that bed next month.  I cut them down with scissors, leaving the roots in place to slowly release nitrogen into the soil over winter, picked off all the brown seedpods, and dumped the trimmings on top of the (now empty) old bookcase beds. I'll be adding some other bits and bobs over the next month or so to help the soil recover and replenish nutrients over winter.  Again I'll talk about that next week, when I show you my new beds, and how to fill them with nutrient rich soil for very little cash.

One of the things I did add though, was tomato leaves. It really pained me because, as you know, I have a fear of pruning, but it needed to be done. 

Tomatoes - The Hackening


The unseasonably warm weather has been great for my tomatoes. They've produced brilliantly despite basically being neglected completely since being planted. They laughed in the face of cane supports and decided to explore the garden instead, rambling off almost as much as the squashes

 They are (or rather, were) still producing flowers even though September is nearly over and the nights are getting cold. The trouble is, the plants are putting so much energy into producing leaves and new flowers and teeny new fruits, they have none left to ripen the green tomatoes already on there, and I'm worried the frosts will arrive before they have a chance to ripen.

You can ripen green tomatoes indoors using a banana or a sunny windowsill, or make green tomato chutney, but they're sweeter if they ripen on the vine and my children will eat them as if they're sweets. So it was time to get over the pruning fear and get them chopped.


By removing most of the leaves, all of the flowers (*sob*) and the tiniest fruits (*further sobs*), the plant will (hopefully!) start putting all of its energy into ripening the fruits it already has so that the seeds mature. The added light to the tomatoes should help too.

As you can see in the above picture, I just used normal scissors to trim them. You could use a sharp knife or clippers designed specifically for the garden, just so long as whatever you use is clean.  I tried to cut diagonally across the stems so that any moisture could run off instead of hanging around creating the perfect habitat for bacteria to breed.


Again we were very lucky with the tomatoes this year and have had no signs of blossom end rot or major issues with pests.  Even the pigeons have left them alone (so maybe overfeeding them has helped a little). That may be more luck than judgement, but it's possible that the eggshell I added to the compost I had them in as seedlings helped too, so I'll be doing that again next year.  I save up our eggshells through the week, then bake them for 10 mins in the oven to kill off any salmonella type bacteria that might be hanging around and stop them getting smelly, then crush them up and keep them in a jar til they're needed. You can use a pestle and mortar to crush them, but I don't have one of those so I use a mug and a rolling pin. 

Once I had massacred my tomatoes I felt a bit more confident about pruning, so I removed the dead leaves from the butternut/cucumber trellis to give the fruit some more light. I didn't realise until I did that we even had cucumbers still, but I found 2 tiny little ones hiding under the dying leaves 

We've had one butternut already (and delicious it was too, I've never eaten butternut squash before, but was given the seeds and decided to try it. I'm so glad I did, hassleback butternut is lush) but there are a couple of small ones still on the plant, and one tiny one, the size of my little finger. I probably should cut it off for the same reason I cut off all the tomato leaves and tiny fruits,  but I just didn't have the heart to. I'll leave the teeny ones and give them another feed, and see how they do.

Garden Jobs This Month


I'll be talking more about this in my upcoming post about sharing your space with Mother Nature, and getting a hand from her in return, but if leaves are falling and grasses are going to seed in your garden, you might be tempted to give your garden a big pre-winter clean up. Don't do it! Relax, put your feet up, and start planning what you want to grow next year instead. 

Leaf litter provides much needed habitat and shelter for all kinds of garden friendly bugs, and in turn that helps feed the birds over winter. The leaves also provide much needed nutrients to the soil as they rot down. We'll be collecting some of them up for our raised beds over the next month, but a tidy garden is rarely a wildlife friendly garden,  so I won't be fretting about raking every last leaf up. 

I will be planting some peas next week to have a go at overwintering them (I'm using the variety Meteor, because I've heard it's very hardy,  but I'm not very optimistic. I'll the you know how it goes), and cutting back most of the dying perennials, like the giant daisies and fireweed.

 The fireweed has been spreading its seed everywhere, so I've cut some and taken them to areas I want it to grow in next year. I'll leave a few stems when I cut them back to the ground for ladybirds to shelter in. 

The stems I do cut will be going into the raised beds, to enrich the soil and act as a mulch. If I didn't need them for that, they'd be going into the bug hotel - a (now giant) pile of garden trimmings, cut grass, leaves dropped by nearby trees and bits of wood in various states of decay that's tucked behind our compost bin under the hedge at the back of our garden. There's an old rabbit hutch somewhere under there (rabbit removed beforehand) which is an ideal hibernation spot for local hedgehogs. The birds use it as an food source and shelter all year round, and in spring it's alive with ladybirds, a very welcome visitor to any garden. If you have even a tiny space to keep a pile like that, go for it. Our wildlife needs all the help it can get, and in return, it'll help you.

I'll be harvesting the last of the apples around the autumn equinox too. We've had a lot this year, so I'll be baking apple pies for the freezer and maybe trying to work out how to dry apple slices, if they last that long. My children think the best place for long term food storage is in their bellies and when it comes to fruit and veg I'm inclined to agree with them.

And of course the most important job this month: enjoy the last of the warm weather and sunny days before the dark half of the year. 

Half the fun of gardening is in stopping to smell the flowers.

Merry Mabon my lovelies, happy growing x

Sunday, 15 September 2019

"Dwarf" Fruit Trees


In my first post, I mentioned that when I first moved in to this house, I planted three dwarf fruit trees. I promised I'd tell you more about them later. This probably counts as one of my biggest garden fails, was a total rookie mistake, and I'm still not sure how to fix it. But I'm getting ahead of myself.

When we first moved in I was super excited about the idea of food forest gardening - a low effort gardening technique that mimics the multilevel production found in nature. I wanted to get fruit trees planted quickly, so theyd get on with producing fruit quickly (generally speaking, fruit trees take about 3 years to go from bare root plants to producing fruit).

I ordered bareroot dwarf grafted apple, plum and pear trees (Braeburn apple, Conference pear and Victoria Plum if I remember rightly, but it was a long time ago). 

My planting technique was good -they arrived in early November and the weather was quite mild with the soil neither frozen nor waterlogged. I dug a hole about twice the size of the rootball, threw in some fish, blood and bone fertilizer, and planted the trees, backfilling the hole with a mixture of compost and the soil I'd dug up to plant them, up to the soil mark on the trunk where they'd obviously been planted before. They stood about 4 feet high, and the planting instructions (such as they were, you don't get many instructions with budget plants) assured me they'd grow to around 5foot, maximum. That suited my garden size. So far so good.

What went wrong?

My planting technique was great. But my planning left an awful lot to be desired, and my pruning...well.

I've always been scared of pruning. I worry about cutting back too harshly and damaging the tree, or inviting in disease and pests. And I figured that wild trees never get pruned, and they're fine. This was one occasion where I should've ignored my instincts and got some advice from a seasoned gardener.

Fast forward 10 years, and I'm trying to reclaim the garden. The apple tree is a nice size. It struggled to get going because the corner I planted it in doesn't have a lot of light and it is competing for nutrients with a huge overgrown hedge and other wild plants, but this past two years it's given us a bumper crop, with no maintenance at all. One out of three aint bad I guess.

The Conference pear and Victoria Plum are now both well over 30 feet high and still growing. 

Here is the Victoria Plum, taken from an upstairs window. Dwarf tree she most definitely is not. Despite all that blossom, we had only one plum this year. I'm not sure if that's just because the birds were stripping the fruits off when they were tiny, or if the tree has just put so much energy into height, it has nothing left to give for fruit.

As you can see, I planned the site of the tree badly. It's up against my boundary, so I can't walk all the way around the tree, and my lack of pruning means it's now helplessly out of control, and I'm not sure how to rescue it, or if it even is salvageable at all. If you have advice, I'd be very happy to hear it.

It's a similar story with the Conference Pear. It shot up and is a similar height to the plum, but it has never fruited, and blossomed only once.

 Looking back I think it may have had signs of pear tree rust when I first got it, so I always assumed that's why it didn't fruit, but much like the plum, it's now far too huge to manage anyway, and poorly sited so I can't walk around it.  At least the birds love to nest in them, and we get the joy of being greeted by song every time we step out the door.

So, that went wrong. That's something I find myself saying a lot when it comes to the garden. But there's hope for my mixed orchard yet.

The picture is pretty awful, but during the years of neglect the Victoria Plum must've dropped a plum, and it has grown into a healthy looking little sapling.


It's currently just under my shoulder height, and seems really happy, so I'm going to wait until the dormant season and then attempt to move it across the garden to become part of my mixed native hedge.  It's really important I don't let it grow out of control like the others (apart from anything else, that would upset my neighbours and block light to my planned veg garden) but I'm thinking that if I'm brave about pruning it should be fine. And if I cut it back too hard and it dies, I won't have lost any money on it.  I'm not sure it'll ever fruit, coming from a dropped seed rather than being a grafted tree, but I'm always happy to have more nesting sites in my garden for the birds and the insects. After all, they were here before me, it's their home too.

When I move it, I'll try and film the process to show you how it's done.